Well, this is the second baby opossum we have caught in the last week! When my husband went out to close up the chickens for the night, this little guy ran right past him. We think he was helping himself to the chicken feed and maybe even the eggs
Apparently, opossums enjoy the taste of fresh eggs and the adult opossum has been known to help itself to a fresh chicken!
Unfortunately, this little guy isn’t the last of its kind in our yard. We are still trying to catch the momma. I saw her rustling around the tomatoes one night. She is not as cute as her babies. Hopefully, we can lure her into the trap with some lunch meat, like we did her kiddos. Until then, we have been putting up the chickens early, since opossums are nocturnal. Wish us luck!
Our Dear Sweet Whiny Penny has passed away. The kids and I went to town and when we came home we noticed the chickens had gotten out. Our Mother Hen Abby The Chicken Licker had licked Whiny Penny to death.She almost ran Harrie & Genuine to death. This tragedy was absolutely not Abbys’ fault. I felt so bad for the kids to have one loved pet hurt another beloved pet. We now double check things. Abby still loves her chickens and wants to mother them. We still love her as much as we always have.
Hunter the boy who named Whiny Penny was given a new chick to name.Guess what he named her…. “Whiny Penny the 2nd”.
Tears for our chickens and Love for our Chicken Licker,
We recently had to replant some tomatoes into our beds. Normally we just loosen up the soil, wet it down and then stick in the new plants. However, this time we received an “old school knowledge” tip from a friend, and decided to give it a try.
After loosening the soil and digging a hole for the new plant, we cracked the shell of a hard boiled egg then placed the egg where the new plant will sit.
We placed the plant roots directly over the egg.
Next we covered the plant roots and egg up with the soil.
Wondering why we buried the egg under the plant? Well, according to “old school knowledge”, as the egg deteriorates, nutrients will be released into the soil, thereby feeding the tomato plant throughout the growing season.
We are excited to see if this really makes a noticeable difference. We will keep you informed.
The temperature around here has been soaring, reaching into the 100’s.I have noticed that we are not the only ones feeling the heat. The chickens have been taking shelter under a tree in the coop for the better part of the day. They are mostly only active during morning and evening hours.
When I saw them out tonight, I could not resist giving them one of their favorite treats. It won’t be long before this watermelon it nothing but rind.
Oh, and you will notice in the upper left corner, our dog Kona. He is eyeing one of his favorite treats, CHICKEN! Good thing the pen is secure.
As our babies have grown, they have started to spread their wings. We went outside the other night to lock them up in their coop for the night and were scared when we couldn’t find them in the pen. After a frantic search of the yard, we finally looked up. To our surprise, all three babies were perched upon an arbor about 9 feet high! With the help of a ladder, they were soon locked away safely for the night. A couple of days later we decided it was time to clip their wings.
While chickens are know as flightless birds, they are still able to utilize their wings to travel short distances. Our babies started this at two months old and have gotten stronger and started to fly higher and longer as their wing feathers developed. As they age and put on weight, their ability to go high or far greatly decreases. But in the mean time, a quick snip of their flight feathers is a good idea.
To accomplish this task, it usually takes two people. One must hold the bird close to them, so the second person can do the clipping. We used a pair of household scissors to cut with. Simply extend one wing to expose the long layer of flight feathers that are tucked under the wing when the bird is walking. Cut about 1/3 to ½ of the length off. It is only necessary to clip one wing on each bird. The purpose behind this is to throw off the chick’s balance, so they can not fly high.
Below are images of the steps I have described:
The chicks have no feeling in their feathers, just like human hair. They will suffer no bad side effects from doing this. You may notice, as we did, they will pick at the trimmed wing for a short while after you cut it. They do this because they realize something is different, not because they are in any discomfort.
With the wings clipped, we now don’t have to worry about them flying the coop!
Are you wanting a Chicken? Make sure you know what you are getting.
One of the local places to get hairy legged chicken (Feather Legged Chickens) is in Norge, Oklahoma (Southwest of Chickasha) at the Norge Feed Store. In May I took the short drive to Norge.
When you go to this feed store you almost always are interrupting a very "DEEP" conversation being had by “the men”. One fella will always step away from this, no dough interesting, informative & make me jealous I can’t be in, it conversation. I told him I wanted a hairy legged hen. He reached in a box of 17 or so chicks and pulls one out saying he "thinks" this one is a hen. This hen is orange and golden. I say ok and pay $2.50 for Harrie-It. The kind man puts her in a box and we take her home.
After a few days I hear this strange noise coming from the room we had our chicks in. She is on top of the feeder trying to crow!!!!.... What she's a he.
I guess she I mean he will be called Harrie now. I really only want Hens...I am sure we are going to have to give him away.
As you know, seeds can be expensive. To curb the cost of buying seeds and garden plants, we have started collecting seeds from various fruits and vegetables as we eat them. Not only do we get to enjoy what we have eaten, but for the same price, we are able to harvest seeds for our backyard gardens.
How do you do this?
When you are dicing and slicing fruit and vegetables, remember to scoop out any seeds and set them aside. Simply rinse them and place them on a paper towel to air dry.
We placed some seeds in a plastic bag with the intention of planting them very soon. If you are not ready for this step, you can store them until planting time. Lay seeds out on a paper towel and allow them to dry completely. Next, place them in an air tight container such as an old baby food jar, Tupperware or anything else with a lid. Before storing, it is a good idea to write the date the seeds were collected and the type of plant they came from on the container.
To store and sew seeds, follow these rules of thumb.
Keep them cool and dry. A fridge or freezer is a good place because temperatures do not fluctuate and the humidity is low.
There is no set time per seed for how long it can be stored. As long as the seed is mature when harvested, it should go dormant until planted.
Each seed germination time and sprouting conditions vary, so, when storing multiple seeds, do not expect that they will all sprout at the same time. Be patient.
Also, take time to research different seed types and growing conditions for your area. Remember, we all learn as we go and failure is an option. But, don’t let that keep you from trying. You never know what you might get.
Below is an example of seed harvesting success! We harvested the seeds from a cantaloupe purchased at the grocery store. We planted them right away instead of storing.
The answer is YES I do think so. Harrie-It has turned out to be a problem child. She has decided she does not like Whiney Penny. Every chance she gets she attacks her. Harrie-It shreds the paper in the bottom of the box we keep the chicks in, keeps everyone away from the food and water, puffs up to look big and tons of other things that are Devilish in nature. As the nightmare of a story is unfolded to Ling Ling she laughs and said that is the literal “Pecking Order” taking place. Ling gave me some stuff called ROOSTER BOOSTER PICK-NO-MORE COVER-UP LOTION to put on the bullied chicks head.
ROOSTER BOOSTER is an amazing product. When the chicks get it in their mouth it has an awful taste. They try to wipe it off on the ground. After The Devil Chicken (AKA: Harrie-It) got a mouth full a few times it curbed her hatred for Whiny Penny.
On April 23rd we were gifted 2 chicks that were used in the church petting zoo for Easter. The chicks were about 1 week old. A Crutch kid named one that day Genuine. The other went nameless for weeks until a neighborhood kiddo came over. He named her Whiny Penny. What a great name. We told him in honor of her getting a name, he could have her first eggs.
As of today they are approximately 7 weeks old. They are two peas in a pod. They stay close to each other and act in sync with each other. They are starting to fly. They even seem to recognize my voice.
Harrie-It came from the Norge Feed Store on May 17, 2011.
So named due to the feathers on her legs. Hairy leg chickens can come in all breeds. I just love them. Harrie-It is a big ol' baby. If the other two chicks move out of sight she gets very upset and loud. She likes to keep the other two in check.
Updates on the little darlings will come as the chicks grow and lay eggs. This is all very exciting. We hope we are relaying how cool it is to be a "Chicken Farmer" !
Composting is the breakdown of kitchen scraps, lawn clippings & leaves to be used as fertilizer and soil amendment.
With time, and minimal maintenance, the collection of organic materials will turn into usable soil that is rich in nutrients and minerals that your plants will love.
What you can compost:
Raw Vegetable Scraps
Rotten Fruit
Egg Shells
Shredded Paper
Lawn Clippings
Leaves
Small Limbs (less than ½ inch in diameter)
Pine shavings or straw from pet cages (i.e. Guinea Ping, Hamster or Chickens)
What you can NOT compost:
Any foods that have been fried
Oils
Meat
Plastic
Large tree limbs (over ½ inch in diameter)
Once you decide to compost, the first thing you will need to do is find a place to collect it! Keep in mind while you do want a convenient location, it is important to choose an area that is not near a door to your home. Decaying compost will naturally draw insects, squirrels and other critters.
This compost pile is on the side of the house away from any doors.
You will notice that the compost will quickly begin to “pile” up. Building some type of structure to contain it is advisable. Also, the pile must be “flipped” every two weeks. This can be done using a shovel or rake. It is important to not let your pile dry out. To prevent this water your pile every week depending on the weather in your area.
Simply scoop from the top of the pile and flip to blend in recently added material.
How do you build a compost container?
You can use just about anything to build a compost pile. Building a frame out of bricks, blocks or scrap wood is a good idea. Also, you could opt for T-Post and chicken wire or buy a composting barrel.
Here is an example of a commercial barrel. It retails for over $100.
For the compost pile pictured below cinderblocks and wood scraps were used.
The above pile was recently relocated from a different area of the yard. It has been building for approximately 17 months and has yielded about a dozen 5 gallon buckets of compost over that course of time. Keeping the pile free of meat and oil products has prevented any unpleasant odor from developing.
Below is an example of the soil retrieved from the bottom of the pile after turning it. This batch was added to enrich the normally sandy soil, in an area of the yard, before transplanting some plants.
A tornado In Oklahoma? Not so unheard of. A tornado in Chickasha, OK?? The last timeatornado hit Chickasha was on May 3, 1999. That tornado skirted the town but on Tuesday, May 24th, 2011 a tornado hit the east side of town. The entire state of Oklahoma was warned about the possibility of the tornado a few days before.
The day started calm & serene. You could see the clouds packing in but that is nothing unusual on a stormy day.
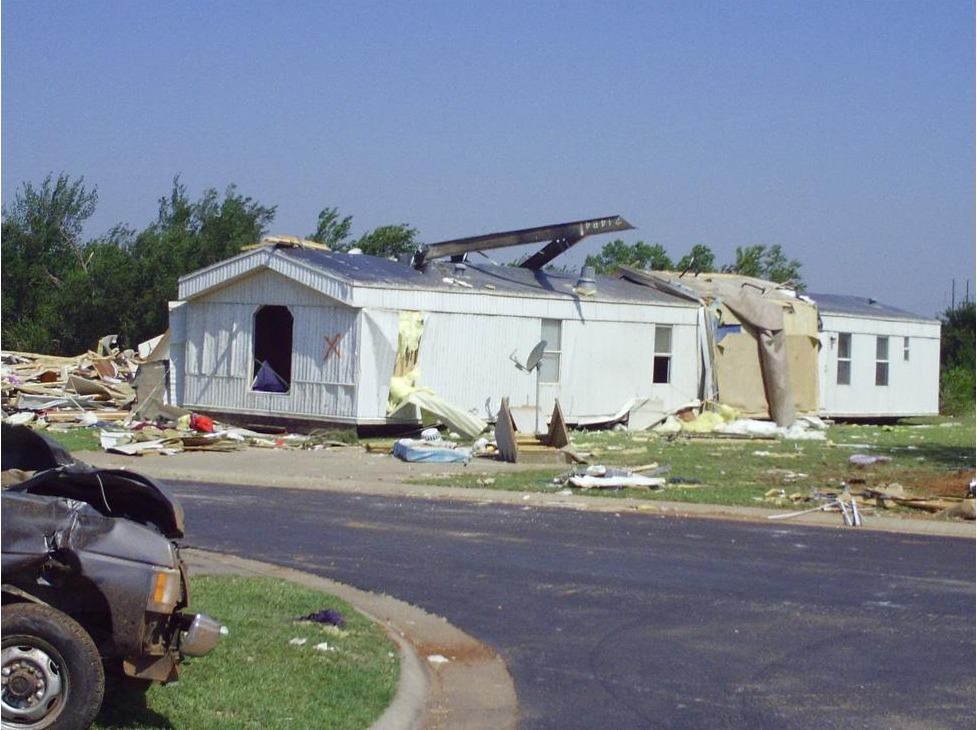
The sirens went off a few seconds before the tornado hit between . People were outside, at work, at home. School was out for the summer. It hit the east side of town, including, a mobile home park, a few apartment complexes, a church, a strip mall, gas station, several small businesses and several homes.
After a tornado rips through your life what do you do? Thank God no one was hurt. You know “things” can be replaced….You may question God as to why this happened. If you are lucky, you are standing looking at your house trying to understand. Realizing your belongings are all over the county. You slowly understand you need help. Not the kind of help that comes from friends after work or on the weekend, but the immediate emergency, need it now kind of help. Immediate shelter, food and clothing are a priority. Granted you may have that one pay check you can splurge with for dinner out or a new outfit for Sunday morning, but I don’t know any of us that can by a new house, a new car, new clothes for the kids……the whole bit.
So what do you do....?
·Red Cross headquarters for Chickasha is currently set up at BibleBaptistChurch. They are offering temporary housing for those dislocated by the tornado and meals are being provided by Salvation Army mobile unit. Please join us in prayer for all the families and businesses that have been affected by this storm.
·CrossroadsCommunityChurch is asking that those with immediate needs to contact them.
·Local Food Pantry
·Your friends are always a source of kind words, baby sitter, a couch to sleep on, good meal or just a pair of ears to hear you.
·Your family will not take no for an answer. They will do anything they can for you. Just ask them. It’s okay; this is a mother-nature induced need for help.
What do you do when you know a tornado is coming? Or, just want to be safe rather than sorry.Click on the link below for our local News Channel 9 safety tips.
Tuesday May 24, 2011, God proved Himself to be Jehovah – Nissi (My Protector). Two tornados made their way into the city limits of our small town. Though my step-daughter lost her home, and my youngest stepson’s place of work was destroyed, they both came through without a scratch. Our Father is truly the giver of all good things. In this blog I have been able to highlight a few of the earthly blessings He has given me, I want to take this moment to thank Him for one of the most precious - my family.…Ling
This was my stepdaughter’s home. The homes on either side of her's were destroyed.
This is where my stepson worked. He left just before the tornado hit.
(Image rights belong to The Chickasha Leader)
When the tornado came into my little neck of the woods I had gone to the $ tree and Wal-Mart. Little did I know how close things came to the kids and I. Praise God for the protection and the calm state of mind he put around my family. After we were released from Wal-Mart I thought we would see if anyone needed our help. By the time we made it to the hardest hit areas emergency crews were already in place. So we decided to check on the church. A 1/3 of the roof was ripped off. Within minutes a few others showed up to check things out at the church. It was very cool to see how many people came out to work without being told there was even a need. In a matter of hours everything that could be done was done. The next day they started getting the roof covered and succeeded in that. The women made sandwiches and pushed rakes.It will be a few months before we will be able to get back in that building….Praise God you can have church in any building….Crutch
This is the Wal-Mart where my kids and I sought shelter.
(Image rights belong to The Huffington Post)
This is Grand Assembly of God, my church home.
We can’t wait to see what great and wonderful things God is going to bring out of this devastation. May God be with the people whose lives were, and continue to be, affected by this event.
As for the color of ribbon pick thing you think a lady bird would like to see in her nest.
Mesh Bag-Like the one popsicles come in. Popsicle? Don’t mind if we do...
How to make a B-N-B:
Cut ribbon, yarn & fabric in to 3-5 inch pieces.
Fill the bag with scraps.
Tie ribbon or fabric around the top to hang from a tree.
Walla.....You’re done and the Birdies thank you!
Hint: In our case the Popsicle bag was too long
so we cut it in half.
Then use ribbon to tie the end just like you would the top.
The night before you start this project put your popsicles in the freezer so you can enjoy one while you are watching the birds pull a ribbon to make their nest attractive.
What is a SPROUT?
–verb (used without object) to begin to grow; shoot forth, as a plant from a seed. *dictionary.comWhat is a SPROUTING?Sprouting is the practice of germinating seeds to be eaten either raw or cooked.
*wikipedia.org What has SPROUTED? Success
*Sha Chicks
On a recent trip Ling Ling had a salad made mostly of sprouts. In this time away from her non-sprout region (her kitchen), she noticed sprouts on burgers, being used as garnish, mixed in stir-fry... AND it was all good!
This brings us to today. Ling said she would like to try and grow sprouts. Well if she is going to try, so am I.
This is how we went about it….
What you need:
Jar- We chose a canning jar with a screw-on lid. Any recycled well cleaned jar will work. Screen- Make a simple screen to fit under the screw-on lid. We used aluminum window screen. You can use cheese cloth and a rubber band or twine.
Seeds- Found at your feed and seed store or order online. (Freeze until you need them)Organic seeds are best other seeds may be treated with fungicides.
What to do:
Measure & Pour seeds in jar, fill jar half way with water and soak overnight.
small seeds: 2-3 tablespoons
medium seeds: 1/4-1/2 cup
large beans and grains: 1 cup
Rinse seeds often. All seeds, and particularly the wheat, spelt, and flaxseeds, are susceptible to mold if not rinsed properly and frequently (2 - 6 times per day). To rinse, fill jar ½ way with water to cover the seed and swirl. Drain water off. Make sure the jar opening is not covered with seed. We don’t want any yucky mold. Each time you drain the water off , tilt the jars with the opening down on a towel or dish drain. The goal is to have air circulate in the jar so tilt and leave screen not covered with seed.
Wait 3 to 5 days sprouting times are different for all seeds.
Two leaves will appear for each of the sprouting types, at which point they should be ready.
Refrigerate and use in 2-3 days
Failure is an option!!! Just ask Ling; she has yet to find success in her sprouting endeavor. If this happens to you just start over. Keep notes so you will know what worked or what didn’t.
Below is a list of seeds that we sprouted (or attempted to sprout) & our opinion their taste….
Arrow Leaf Clover:
somewhat mild flavor, slightly bitter
Sugar Snap Peas:
technically not “done”, yellow sprouts had a mildly bitter flavor; green sprouts were not palatable
California Black Eyes: technically not “done”, nutty flavor, texture of a raw corn kernel, great for salad, slightly sweet
Mustard:
herbal flavor, hot, good toping with grilled chicken salad
Cabbage:
mild, bland, good filler for salads
VNS Alfalfa Seed: grew early, slight mold development, should have refrigerated after sprouts developed
Here are the Sha Chicks choices for best sprout source…
Best seeds: Cabbage, California Black Eyes The wrap up… To maintain a constant supply of sprouts, a new jar must be started every three days. We however, will be sprouting less often for the occasional chicken treat or to spice up a salad. Never eat anything that is molding!